Ropes courses
Ropes courses are a typical example of transferring outdoor activities into an artificial “adventure” environment. The same development can be observed in white water canoeing (artificial canals), in climbing (artificial climbing walls), in skiing (indoor slopes). Ropes courses are today an individual branch of “adventure industry”, sometimes they are called “challenge courses”. Ropes courses are built either mobile between trees, or stable in ropes course parks. Norms for building, constructing and using have been written: ČSN EN 15567–1 and ČSN EN 15567–2.
According to their height we distinguish:
Low ropes courses - obstacles reach 1 m maximum for a safe jumping down. Today they are part of sport grounds and playgrounds.
Medium ropes courses - their height reach 3 metres maximum. They are used during demanding activities or in educational programmes, always under the instructor´s supervision.
High ropes courses - výška překážek od tří metrů a vyšší. Nutné používání jištění.
All three groups of ropes courses can provide space for individual or team tasks.
Most obstacles are constructed as horizontal obstacles. The most often used ropes courses have their names: free X, tram, tension traverse, etc. Names of non-traditional ropes courses change, usually are named by the provider or builder of the ropes course.
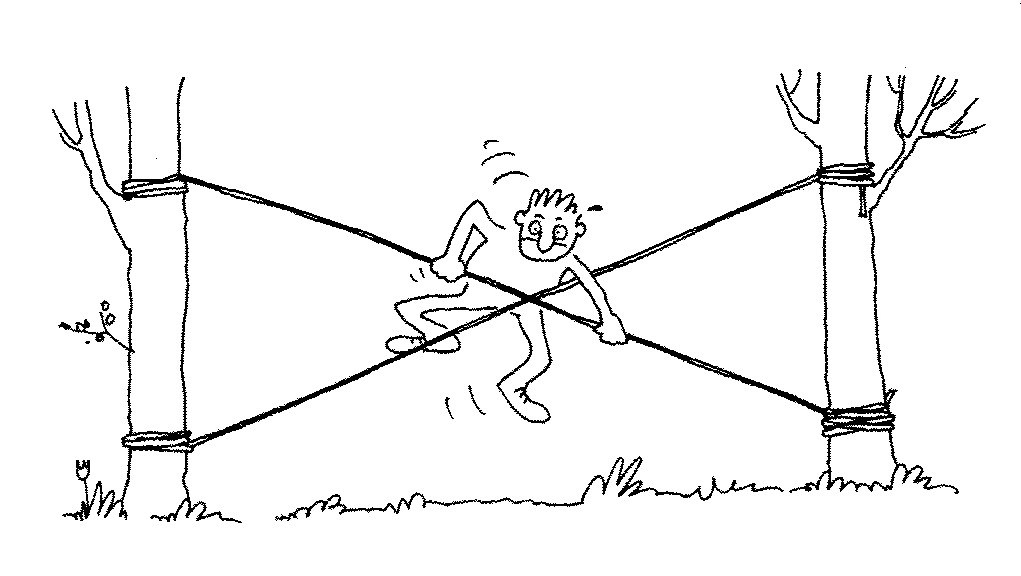
The free X is a classical ropes course (Neuman et al, 1999)
Safety at low ropes courses
Terrain around low ropes courses should be cleaned from sharp objects, such as stones, stumps, cones, branches. The ideal ground is a low lawn, tree needles, in case of stable ropes courses a soft landing substance.
When overcoming low ropes courses, safety is realized by one or two persons, who observe the climber´s movement on the course. The saving person should have arms stretched behind the climbers back. In case of falling he/she makes the fall slower and catches the climber´s head. Catch the falling person on the hips level.
Belaying at high ropes courses
Use body harnesses, which enable clipping on a rope both on chest and back, for belaying at high ropes courses.
Self-belaying
Self-belaying consist of a supporting rope and a belaying set. The self-belaying system is suitable for ropes parks, where a climber climbs up and then overcomes the whole system of obstacles. It is the most frequent belaying in commercial grounds. The climber has to be safe in every moment in the supporting rope by a belaying set. The belaying set has two slings with a carabiner. When crossing the point where the supporting rope is fixed, the climber clips one sling into the new rope section and then unclips from the previous section.
Partner belaying
It is a similar type of belaying like in climbing activities. A climber is belayed top-rope on obstacles. The disadvantage of the system is the necessity to climb individual obstacles all the time. The advantage is using the system in educational programmes, in which we focus on trust development. In partner belaying the rope is usually clipped in the back loop of the body harness, so it does not distract you in movement. The belaying person takes the rope in four steps, has one hand under the belaying device all the time, watches the climber, and moves under the top belay. When lowering hold the rope by both hands under the belaying device.
In partner belaying do have one hand under the belaying device all the time, watch the partner. Do not take the rope in too firmly. When lowering or during a fall hold both hands under the belaying device.
Ropes course construction
Mobile ropes courses bring the possibility to exercise in every place. Building a set of mobile courses requires a certain skill in rope work and with wooden poles. It is necessary to respect the recommended norms from the point of loading and manipulation with steel ropes, when constructing ropes courses. Inspiration for constructing low ropes courses can be found in the book “Ropes courses, climbing walls and experiential education (Neuman et al, 1999).
Stable ropes courses are stable ropes parks or grounds. Creating a high ropes course ground is a demanding and expensive thing. Obstacles are built on poles or on poles and trees. From our viewpoint ropes courses built on trees are best. This variation is cheaper but more demanding for maintaining. Construction of high ropes courses has to keep to the above stated norms.
Here is a list or basic materials for ropes course construction.
- Static ropes
Steel
Steel ropes are made from fibres in which is a set number of wires. For ropes course construction the rope of 6x37 wires, that is 222 wires, is suitable. This rope is very flexible and easy to work with. Connection of steel ropes is done by rope clamps, rope clamps are guided by the norm DIN 741.
Nylon ropes
Nylon ropes are made in different diameters from 9, 0 mm to 11, 0 mm. They are made from a core and a coat. They are used for ropes course construction or for abseiling. Ropes cannot be used for catching a fall. They are guided by the norm CE EN 1891.
Polypropylene ropes
Ropes called “PP” ropes are made by coiling three or four fibres or plaiting. The plaited ropes do not have a core. They are used for constructing ropes courses.
Polyester ropes
Ropes with a very high solidity and resistance against windy influences, they are flexible and soft even when wet. They do not float in water. Thanks to the low drawability the pulley systems are suitable.
Hercules type ropes
Polypropylene ropes have a steel core. This rope type is used for ropes elements at children playgrounds. It is favourite mainly for its lasting and pleasant using.
- Dynamic ropes
Ropes made for dynamic fall catching, during climbing activities like belaying the first or the second climber. When belaying on ropes courses, dynamic ropes are used for belaying on high ropes courses. These ropes have quite different features in comparison to static ropes, which do not get longer. Dynamic ropes can get up to 38% longer when catching a fall. Mechanical parameters of dynamic ropes is determined by the norm CZ EN 892.
Stretching ropes
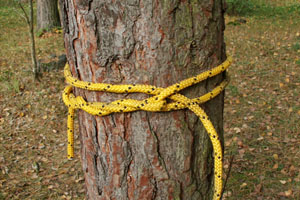
The way of strengthening ropes is determined by material you have in hand. The easiest way is the multiple turning the rope around a tree and its following pulling together. Another simple and recommended way is using a stretching mechanism (a strap and a ratchet). Then you need a sling for creating a tightening knot, a ratchet and a strap for fixing the ratchet around a tree.
In case you have only carabiners and slings, a strengthening mechanism similar to a simple pulley system can be created.
Tie a free rope end to a tree by a wooden loop, clove hitch with a safety knot or a fixing knot.
On the other tree tie a sling around the tree and clip a carabiner in. Clip the free rope end in the carabiner. Another carabiner is clipped into the same carabiner, which serves as a fixed point for a tightening knot/jumar. The tightening knot holds the rope when it is stretched.
Another tightening knot with a carabiner is tied on the rope about 1-2 metres from the tree, the free rope end is clipped in the carabiner.
Stretch the rope and tie a clove hitch around the tree and safe it against loosing. Then you can put the pulley system away.
In case you need to set up longer rope or tighten it more, you can split the mechanism in halves
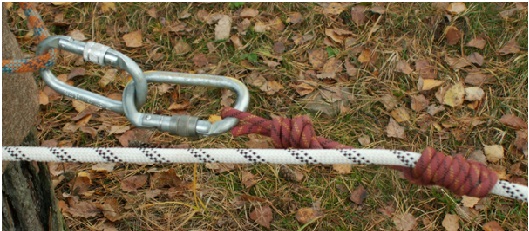
Detail of carabiner and French Prusik knot. Usage of two carabiners helps to avoid attrition/friction of clutching knot and rope in the moment of tensioning.
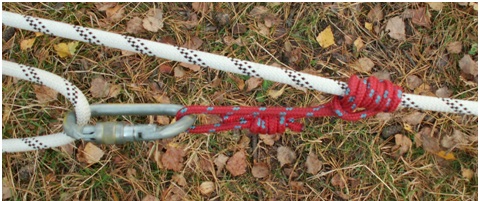
Klemheist detail
Added sling helps increase the rope tensioning
| „Wild V“ is a low rope course for two participants |
| For belaying at „Tension travers“, the belaying partner stands from behind with hands held behind the climbers back and follow him step by step |
| For belaying at „Wild V“ rope course, belaying partner moves bend forward under climbers |
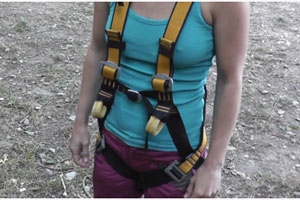 |
| Fasten full-body harness, from the front view |
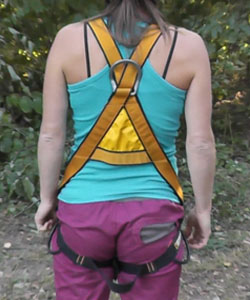 |
| Full-body harness, view from behind |
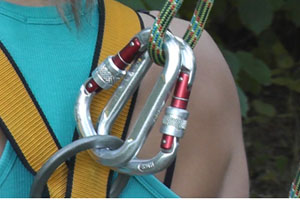 |
| The rope is clipped in to the back loop of the body-harness by two screw carabiners, facing opposite each other, screwing going down |
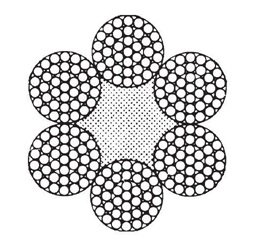 |
| Rope cross-cut 6x37 |
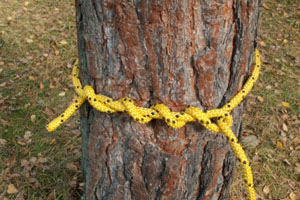 |
| Timber hitch – very easy knot used at the fixed point |
 |
| Kilick knot – combination of timber hitch and clove hitch suitable for fixing rope on the tree - for easy loosen up |


