Orientation in nature and orienteering
Introduction
To be able to orientate outdoors belongs to basic skills, which should learn an every enthusiast and lover moving in nature. There are many situations when orientation and work with a map are handy. Our experience from teaching students proves that it is not necessary to be afraid of it. We think that everyone can learn it, similarly as learning to drive a car or tie a practical knot. What you need is your resolution, do not get discouraged from first fails, gain gradually experiences with map work and devote this activity enough attention and carefulness.
In the following text we would like to introduce basics of orientation in the outdoors, basics of orienteering and equipment, which can make orientation easier for you.
Equipment
If we talk about basic skills in orientation, we talk about orientation without techniques such as GPS (Global Position System), which is today often found in clever mobile phones, tablets or watches. Modern devices determine exactly the geographical position, the height above the sea level or the direction of your forward march and aim. When travelling in nature it is not advisable to follow only this technique and leave classical maps without attention. Therefore, the following text is focused on using basic equipment such as a map and a compass. A map of a suitable scale, a compass and the skill to use them are enough what you need.
Basic terms
At the beginning we introduce several basic terms which are important for orientation and map work:
- Map scale – it says how many centimetres in reality means 1 cm in the map.
- Map signs – explain the used symbols and colours in the map (see the map Ovčín VIII).
- Contour lines – lines connecting places of the same height above the sea level. They are marked only in maps, you will not find them in terrain.
- Equidistance – is the height difference of the neighbouring contour lines.
- Terrain shapes – they are marked in maps by contour lines (e.g. hill, valley, saddle, and ridge).
- Fall line – an imaginary line, which runs in the direction of a slope inclination.
- Valley line – runs through the lowest points in a valley, there usually flows water.
- Ridge line – runs through the highest points of the ridge, there is usually a path
- Meridians – they are the shortest ground connecting line between the north and south magnetic poles. All meridians are of the same length. The north-south lines in maps are called “agreement meridians”, they are mutually parallel.
- Parallel lines – they are circles of a different length running on the Earth ground, they are parallel to Equator and vertical to meridians.
- Compass – is a device, which determines world sides and direction angles – azimuths. It has a magnetic needle, which normally always shows to the magnetic pole and determines the North.
Maps
A map gives us a great amount of information about the landscape, which is reflected in it. Information is graphically well-arranged and according to a map type, maps have a set form, colour and symbols. Basic maps used for orientation in nature are touristic maps - for walking, cycling, and also cross-country skiing (scales are from 1:25 000 to 1:100 000) and maps for orienteering (see below). Maps with smaller scales, such as road maps (scales 1:200 000 - 1:5 000 000) are not too suitable concerning their less detail and little information about the concrete place. We will focus on touristic maps and orienteering maps, which are used the most when travelling and we will mention the main differences between them:
- Orienteering maps are more detailed and have bigger scales – the most often scale is 1:15 000, sometimes – 1:10 000 to 1:1000 (see examples of maps below).
- Equidistance (height difference between the neighbouring contour lines) is usually bigger in touristic maps and is less detailed.
- The same symbols in maps mark different things in reality (e.g. a brown point marks a small heap in orienteering maps and an elevation point in touristic maps).
- The different symbols can on the other hand stand for the same thing in reality (e.g. a significant tree is marked with a small green circle in orienteering maps, while in touristic maps it is marked with a tree picture).
- Number of colours is more limited in orienteering maps.
- The same colour marks a different reality (e.g. the white colour stands for forested areas in orienteering maps, however, in touristic maps it stands for fields, meadows, etc.)
- Different colours mark the same thing (e.g. the green colour stands for forested areas in touristic maps, in orienteering maps is used the white colour in case of the forest which can be easily run through).
- Orienteering maps do not have any texts, names or touristic marking
- Touristic maps have a square net for better orientation. A square side is normally 1 km (e.g. maps with the scale 1:50 000 have the square side 2 cm long). Orienteering maps have only the north-south lines, which are illustrated 500 m apart.
Choose the map always with the respect for your purposes and consider the above stated. If you are not sure, which map to choose, or what scale or date of issue, focus on details. Choose the same part of the displayed landscape and compare maps. If you know the illustrated landscape well, you can compare it with the reality and choose the better one for your purposes.
Below there are examples of maps:
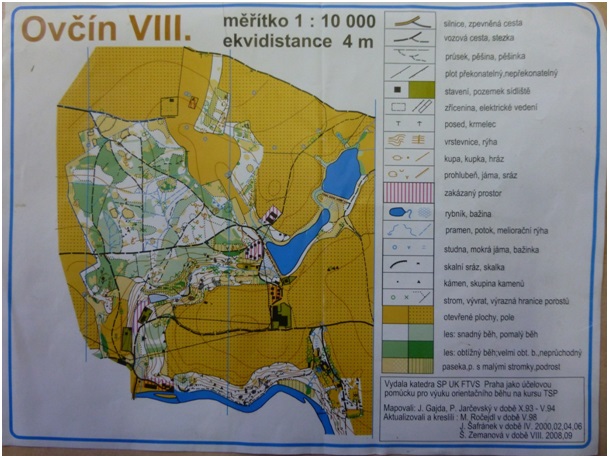
An orienteering map - Ovčín VIII, scale 1:10 000 (GAJDA, JARČEVSKÝ, 1994, the last revision ZEMANOVÁ, 2009)
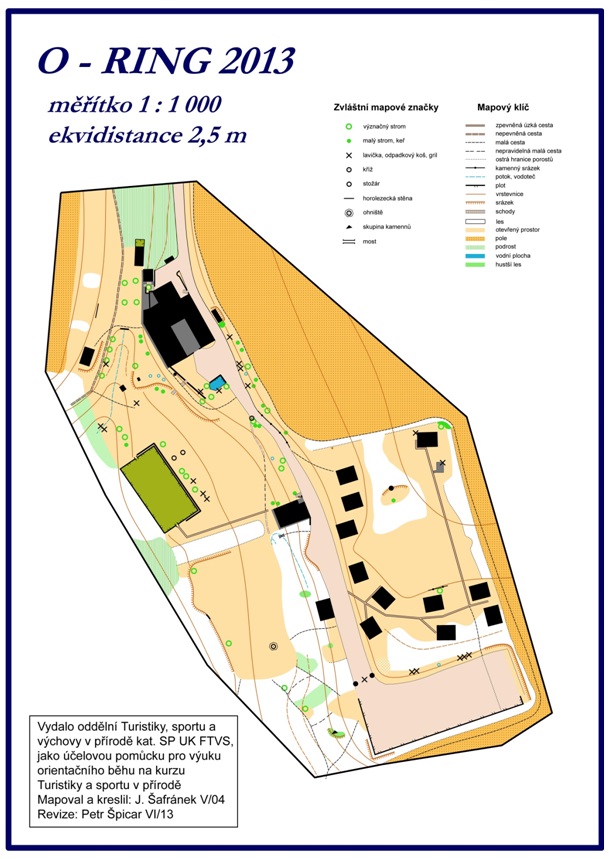
An orienteering map, scale 1:1000 (ĎOUBALÍK, ŠAFRÁNEK, 2004, revision ŠPICAR, 2013)
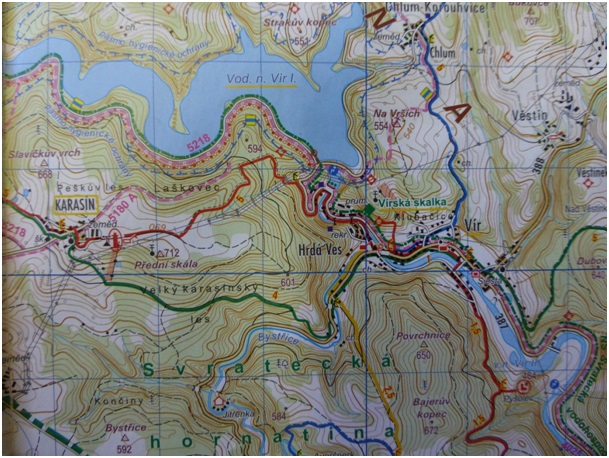
Ždárské hills: a touristic map 1:50 000, edition KČT (KTÚ, 2010)
Basics of orientation and map work
Before you start to work with a map (touristic, an orienteering map or a road map), read three pieces of basic information, which you will find in every map. It is the scale, equidistance and the date of issue, or the date of the last revision. Knowing this information consider its using, if it is not suitable for your purpose, try to find a more suitable one.
If you want to move in terrain, you need to orientate it. To orientate a map means matching the upper (north) map edge with the north in reality. It can be done in two ways. First according to the surrounding terrain which you see and compare it with the map. This way is suitable mainly in cases you know exactly where you stand. The second way is by using a compass. In the horizontal position the red magnetic needle shows always to the north. Having the map in the right position is a key skill, so you could compare the illustrated landscape with the reality and to know where you are and where you are going. When walking, watch your movement in the map and if you are not sure, stop and check your position, or get back to the last known place.
When walking adjust the map with the surrounding terrain.
Orienteering
Orienteering is a sport discipline based on a combination of two skills – good and fast orientation and movement in terrain. Orienteering is the most spread among other orienteering sports, such as ski orienteering, mountain-bike orienteering, or Trail-orienteering. All orienteering sports have the same common goal, which is in the shortest possible time get through the set track.
Controls for orienteering
The racing track marked in a map is set with control points in terrain, which the runner has to find in the set order and mark them. The exception is the race of a “scorelauf” type, in which the order of control points is optional. The control points are white-orange flags and the runner marks it in a paper card by a punch (today occasionally) or by a special electronic chip. Each runner has a description of control points for easier finding (beginners have description in words – today very rare, the others in special pictograms. Pictograms inform you in more detail than the description in words. You learn from them for example which one out of several similar objects it is, the precise object you are looking for (usually a map sign), the object size or the placement of a marker flag on or by the object (for more see the reference ČSOB, 2004).
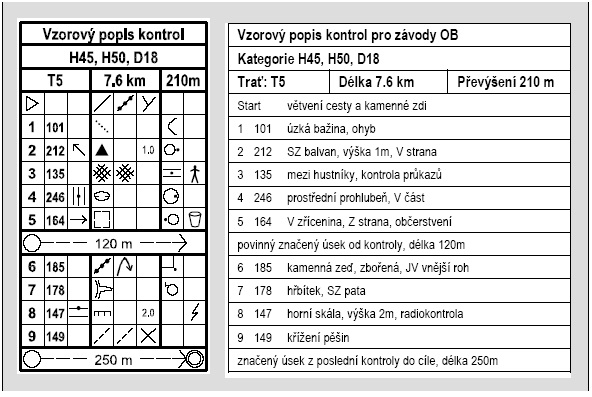
International pictograms (ČSOB, 2004)
Modern technologies in orienteering
Modern technologies in orienteering appeared in 1990s, especially in its second half. At first a special software for map creation has been developed (OCAD – the smart software of cartography) or software for setting tracks (Oorg – Orienteering organiser). Both these software programmes made the work of cartographers and orienteering organizers easier and faster. Today there are many similar software programmes accessible free of charge to everyone – e.g. Open Orienteering mapper or Purple Pen.
In 1994 the electronic system of marking control points first appeared in official races and it started to push away gradually the old classical system of paper cards. The system was developed since 1991 by the Rengly AS Company in cooperation with the Norwegian orienteering federation. Since 1995 this system is offered under the name Emit AS. Today it is used in Scandinavian countries, mainly in Norway.
In 1998 the Sportident Company introduced another system of electronic marking and it met with a great success. The system spread gradually to most official races. The paper card was substituted by SI-card – so called “chip”, which is a memory medium (without a necessary source), which records control points including their numbers and time. SI-units (controls) substitutes the classical punches, marking a code in a paper card. A runner when running through the control point puts the SI-card into the marked circle of a SI-unit, which confirms information saving by a sound and light signal, which is a big advantage in comparison to the system by Emit AS Company. Everything takes in the range of tens of seconds in dependence on the concrete SI-card. Thanks to this system organizers can easily check keeping to the controls order and the runner can know in finish not only the final time but also times in individual parts between controls and their running order. They can compare these times among other competitors and get a feedback to their chosen move in terrain and sport performance.
Several special SI-units are necessary for the whole system functioning. That is mainly the “cleaner”, in which runners can delete their previous race and make space in memory for new data, and the controls “start” and “finish”, which starts and finish the runner´s time. Another necessary part is the “counting unit” connected to a printer, which can print straight after your finish results of individual competitors and in the end the overall results.
Other modern technologies, which has become part of orienteering races (especially the big world ones), are displaying systems. These systems serve mainly to bring this sport closer to public and to attract media and sponsors. Of course they bring also important information for training. The most used systems are RACOM and TRAC-TRAC. The first mentioned system uses SI-controls placed on the track, which are connected to a programme, which with the help to GPS, transfers information about the runner´s time on that control point to the race centre. This information can be further transferred through the Wi-Fi to anyone interested. At big races these control points have also video cameras, which bring an attractive video record from the track. The TRAC-TRAC system uses the GPS and GSM signal and is able to transfer the actual position of the runner in several second intervals to organizers, who can visualize it on huge displays together with the map. In this case the runner has the TRAC unit placed on a vest.
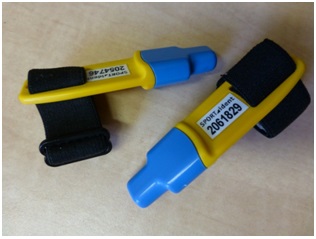 |
| Electronic chip |
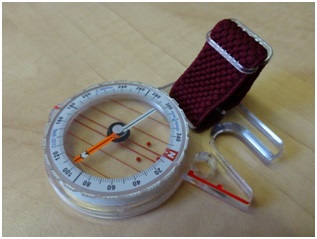 |
| Compass |
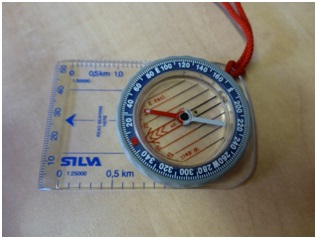 |
| Compass |
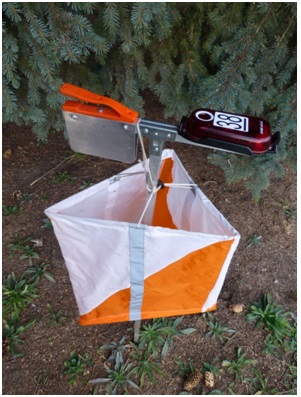 |
| Control point with a needle and electronic punch; the control point is equipped by reflecting strips for night orienteering |
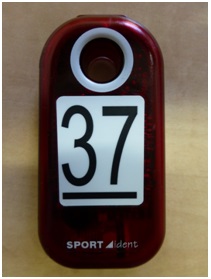 |
| Electronic punch |
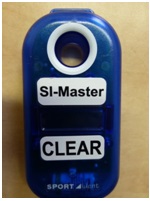 |
| Control point „cleaner“ |
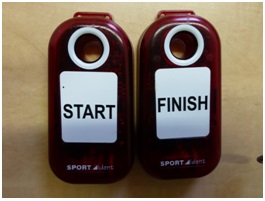 |
| Control point "start and finish" |
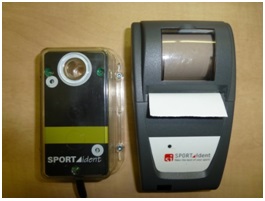 |
| „Result“ station and printer. |
